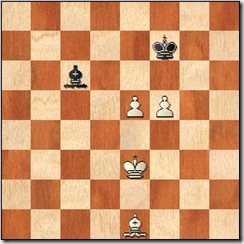
(2) Theoretical position # 1

1.c5 ! Otherwise Black would come to d6 with the king, with a winning position 1...Bxc5 2.Bb3 ! 2...e5 3.Ke4 White can simply shuffle his bishop along the c8-h3 diagonal. This position illustrates how blockade can compensate for huge material disadvantage. Also, we can see that a pawn can be less important than certain positional factors, such as the colour of squares on which the enemy's pawns are located.
(3) Theoretical position # 2

1.Bh4+ ! Controlling 'f6'. White has to prevent Black from sacrificing the bishop for two pawns. [1.Bb4+ ? 1...Kf7 2.Kd4 Bb1 3.e6+ Kf6 4.e7 Kf7 0.00]1...Kf7 2.Kd4 [2.e6+ ?? 2...Bxe6 0.00] 2...Kg7 3.e6 and White wins as after Ke5 the pawns keep advancing *
(4) Theoretical position # 3

1...Bd7! Here Black manages to make a draw. 2.Kf4 Bc8 The bishop just goes back and forth, while attacking 'f5' pawn, so that the White cannot get to d6 in order to support e5-e6. The 'f5' pawn being under pressure is an important defensive idea in these endings: if it advances, Black will immediately setup a blockade on the dark squares. Thus it has to be protected by the white king and White cannot make any progress. 1/2-1/2
No comments:
Post a Comment